Using Photography Templates to Wow Clients Plus FREE Yearbook Ad Template | Ashe Design

Using Photography Templates to Wow Clients

Plus FREE Yearbook Ad Template

Hey Thrifty Togs, it’s Christina from Ashe Design and I’m thrilled to be bringing you a tutorial on using photography templates to really wow your customers. Today I’m going to be customizing the Chalkboard Senior Girl Yearbook Ad (http://www.ashedesign.com/photography-templates/product/yearbook-ads/yearbook-ad-designs-chalkboard-senior-girl.html). I chose this design because it has some awesome features (that I’ll show you as we go through the design), plus I’m totally sold on using Yearbook Ads as a marketing tool – especially for new photographers!

Here’s why:

  1. I know you want to be super thrifty when you are starting out and Yearbook Ads cost nothing to produce. You simply deliver a digital file to the family or yearbook staff and you’ve got zero out of pocket cost! Awesome, right?
  2. Yearbook Ads get your images (and designs) in front of your target market – underclassmen – for FREE! Want to shoot more seniors, make sure you’re offering Yearbook Ads. If at all possible, sneak your logo or even just your URL in the corner of the ad and get ready for some new traffic to hit your site!

Okay, hopefully you’re sold on yearbook ads! Now, let me show you how easy it is to design a beautiful custom yearbook ad with our templates. (Also, this is pretty much the same process for customizing ALL of our templates, so if you can master these steps, you’ll be designing all kinds of custom photoproducts for your customers.)

If you want to follow along and try designing this template with me, just sign up for our newsletter (http://www.ashedesign.com/blog/free-yearbook-ad) and I’ll send you a coupon to download this design for FREE.

Using Photography Templates: A Step-By-Step Guide

Step 1: Open Your Files

I like to open my template and my photos and just have them as tabs inside of Photoshop. A lot of people wonder what the template they download looks like compared to the display on the website, so I thought I’d show you a side-by-side view.

On the left, you’ll see the website display for our full page Chalkboard Senior Girl Yearbook Ad (http://www.ashedesign.com/photography-templates/product/yearbook-ads/yearbook-ad-designs-chalkboard-senior-girl.html) and on the right is that template, downloaded from the site and opened up in Photoshop. You’ll notice they look exactly the same, except the template doesn’t have the images!

Photography-Templates-Step1-OpenFile

Step 2: Add Your Images

Next you’ll want to add your images to your template. In Photoshop there is always more than one way to do things and you’ll find what works for you.

With my image up, I generally either drag (with my mouse) my image over to my template, or you can select your image Control + A (Command + A on a MAC), then copy the image Control + C) (Command + C on a MAC), then go back to your template and paste Control + V (Command + V on a MAC).

Pro Tip: If you selected the photo layer in the layers palette first, your image will go directly above that layer when you drag it or paste it into the template. If your image is not directly above your photo layer, you’ll need to drag it to the correct position in the layers palette.

Most times, your image will be too large for the photo area and take up most of your page, like in my example below. We’ll need to resize it, but first I like to clip the image to the photo layer. To do this, make sure your image layer is selected (and directly above the photo layer) and hold down your ALT (PC) or OPTION (MAC) key and click between the layers in the layers palette.

Alternately, you can use your menu options and go to Layer > Create Clipping Mask. This will place your image inside the photo layer and it will also allow your image to take on any special properties of the template, as you’ll see when we add the background layer to this template.

Photography-Templates-Step2-Add-Clip-Images

Step 3: Resize Your Image

Believe it or not, this is where I see so many photographers struggle. I don’t know about you, but nothing drives me crazier than images that get all squished up or stretched out. It’s really easy to keep images proportionate as long as you know the trick. So, with your image layer selected you’ll want to transform (resize) your image. You can do this by clicking Control + T (Command + T on a MAC), or you can find in the menu, Edit > Free Transform.

When you do this, a box will appear across the top of your screen (see below) that shows the dimensions of your image. Between these dimensions, you’ll find a lock button. If you click that lock, Photoshop will not let your image become skewed. You can resize by adjusting the numbers in those boxes or by dragging the bounding box (gray box you can see around my image below) and it will stay in perfect proportion the entire time. Once you are happy with your image, just click Enter/Return to set the image.

Repeat steps 2-3 for all of your images. This template only has two images, so I needed to go through these steps twice, once for the foreground image and again for the background image.

Remember, I said this template had some really cool features? See how the background image looks in this design? Those effects are already incorporated into the design, so as soon as you clip your photo to the layer it takes on those effects. My background photo was a full color image, just like my foreground image until I clipped it to the photo layer. Pretty cool, huh?

Photography-Templates-Step3-Resize

Step 4: Customize Your Text

The images are added, now you just need to customize the text. Simply double click on the T in the layers palette to select the layer and then you can type in the correct name, year, message, etc.

Just like with the background image, this design already has a chalkboard effect added to the text layers, so you don’t have to do anything to apply that. Simply type in your new text and you are all set.

Note: if you do have the yellow caution signs on your text layers that you don’t have the fonts we used in the template installed on your computer. You can reference the website or the read me files that came with your design to find the fonts we used. Many of them can be downloaded for free, or you can choose an alternate font from your library.

Photography-Templates-Step4-Customize-Text

Once you’ve finished customizing your design, you just need to save the files and you are done! Don’t forget, if you want to give this design a try, you just need to give us your email address (http://www.ashedesign.com/blog/free-yearbook-ad) and we’ll send you a coupon to get this design for FREE!

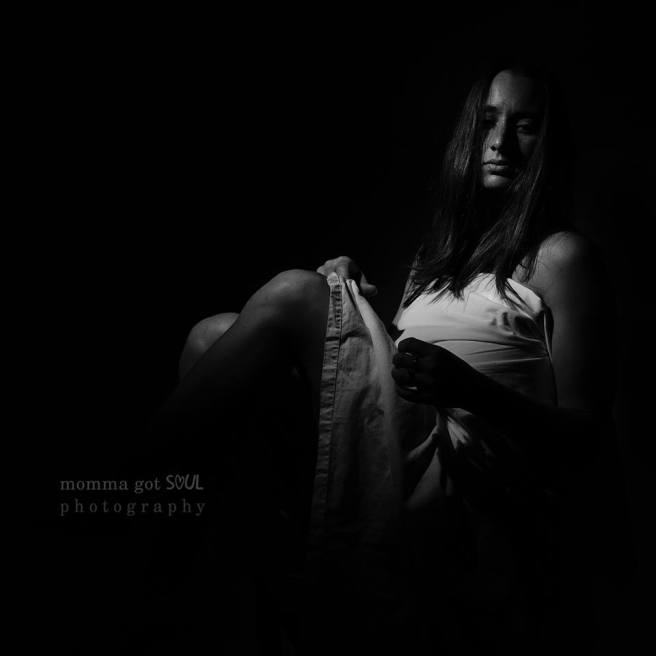
A special thanks to Artistic Images ~ Portraits by Elizabeth for letting us use her beautiful images in our designs and tutorials.

Thank you so much Christina and Ashe Design for this awesome post!!

Please comment and let us know if you enjoyed it; and we’d love to see a link to your own spin on this tutorial!

Filmy Effect Tutorial | Lauren Bee

I was in awe of this image I saw posted by Lauren when it popped up in my newsfeed, and she agreed to share with the readers of The Thrifty Tog Blog a tutorial on how to achieve the same effect! I can’t wait to try this out myself!


I was a fine arts major in college. At some point in my higher education career I also majored in theatre and performance education, history, English, and psychology, but I was a fine arts major the longest, and in fact, my changing majors so often was an indicator of what I truly am at heart: an insatiable artist gone rogue with a love of learning. My favorite thing in the whole world is having a flash of (what I think is) pure genius, and then gathering the knowledge, skills, and materials to bring that genius to life.

It’s this, I think, which drives my desire to take a shot perfectly in-camera. Even though I use a DSLR and can (and do) edit my photos after capture, it’s a challenge to perfect it before it ever gets to the editing stage. A competition with self. Just to see if I can. This means I often incorporate a lot of hands-on, in the moment techniques, using unusual (but common, household) tools in order to get desired effects.

Today’s tutorial uses just such readily available materials. No pricy equipment needed, oh no! Just head to your kitchen (and bathroom) to grab some ingredients – we’re cooking up a luscious film effect, a la Shakespeare’s doomed Ophelia. Here’s what you’ll need:

  • Ziploc bag (the smaller sandwich size works best)
  • scissors
  • powdered milk
  • bathtub (full of warm water)
  • gauzy fabric (like tulle or sheer lace)
  • DSLR camera (I’ve used a Nikon D7100 and 35mm 1.8 lens)

To set up, cut off the sealed end of the Ziploc bag, just a half inch or so. The more jagged and ragged the edge, the better; neatness doesn’t count. The idea here is to make a sort of plastic tubing that you can hold around your camera lens – just around the perimeter of the lens, to give a sort of blurry fringe to the frame of your shot. It’s a similar effect as using a Lensbaby, but without the pricetag.

A

Have your photographic subject wear the lace or fabric, wrapped loosely around her mid-section and shoulders (my model wore just a simple white tank underneath a lacy tunic from my closet), then submerge herself into the bath – make sure the temperature isn’t uncomfortably hot, but if you’ve got a little steam rising from the water’s surface, all the better for effect.

You’ll want to make sure you have adequate light. This shot was taken late afternoon with indirect sunlight streaming from a nearby window. My camera settings for this shot were ISO 500, f/4.5, 1/160sec.

Pose your model as desired and then have her remain as still as possible so that ripples subside. As soon as the water is calm and glassy, sprinkle some of the powdered milk into the water and over your model. This where you have to work quickly because the milk granules will dissolve instantly, and it’s the milky “tendrils” you’re looking for in the water; you’ll do your best shooting before the water becomes completely opaque, no more than five minutes. Shooting with the ziploc bag, adjusting its position accordingly to strengthen or weaken the blurry fringe around the frame.

B

After you’ve created the magic in-camera, just a few adjustments are needed in post editing. For my shot, I first cropped, then set up a subtle S-curve for matte, then I deepened the contrast, exposure, and clarity.

C

I decided the image looked better, so I flip-rotated it, then I added some very subtle grain, and a soft vignette.

D

Lowering the saturation, softening the shadows and vibrance, and scaling the temperature to a more blue tone completes the photograph.

E

And voila! The final effect is a little dark, somewhat creepy, and definitely evocative of film photography.


Lauren Bee

Email: lauren@laurenbee.com

Website: www.laurenbee.com

Facebook: www.Facebook.com/LaurenBeePhoto

Instagram: www.instagram.com/laurenbeephotography/

Google+: www.plus.google.com/+Laurenbeephoto/about

Pinterest: www.pinterest.com/laurenbeephoto/

Twitter: www.twitter.com/LaurenBeePhoto

Are you a hobbyist or in the business of photography?

I’m “in the business” with a sharp side of experimental hobbyist. I definitely got into photography because I love it and the ability I have to express myself, and when I’m not shooting for clients, I’m going my own way, doing my own thing, learning by full immersion.

When did your love affair with photography begin?

I’ve always been interested in visual imagery, even as a youngster. I started out on point ‘n shoot Kodaks, throughout my childhood, experimenting with angles and such, but was always left disappointed; they just wouldn’t reproduce what I was envisioning. It wasn’t until I got my first real DSLR (a Nikon D3100) back in 2011, and started to learn manual settings, that I really hit the ground running.

What gear do you have in your bag? 

My best friend is a Nikon D7100 with (primarily) the AF-S Nikkor 35mm 1:1.8G. I occasionally use my 18-55mm 1:3.5-5.6G II and 55-300mm 1:4.5-5.6G ED — but I much prefer the extreme lengths that I can push my lovely 35mm Prime.

What is your absolute best thrifted photography find?

All of my camera gear was purchased second hand, and I’ve actually sewn some camera straps out of fabric scraps. Art is, after all, about self expression and going your own way, and personalizing your gear falls into that realm.

Have you learned anything in your journey that you think would be beneficial to other photographers?

I can’t stress enough: learn your manual settings. Experiment with them — and with your surrounds. It’s not the gear that makes good photography; it’s a willingness to explore and push the limits of your knowledge. Play — and if it’s safe, do and use whatever you can to get the shot!


Thank you so much, Lauren, for sharing this awesome tutorial with us!

Picks for SUMMER LOVE by Guest Judge Erin Barkel Photography

Our OTTC, Erin of Erin Barkel Photography, was our guest judge this week. She picked the awesome theme SUMMER LOVE and wow! We were all blown away by the submissions!!

ottcerin

Thank you so much Adri & Jes for allowing me to be the guest judge for {Summer Love}.  Man!  My job was hard as I really do love every image! I want to pick them all but I can’t!

I’ve noticed in my selections that I love photos that really engage me.  That have a story.  I don’t know what the story is but I can relate to them and my imagination adds it’s own story to the image. I love that feeling of connecting to a photo.  The amazing photographers I’ve included in my favorite images really succeeded in connecting me with their images.  Congratulations to all of those who participated! Excellent work and capture on!
Nicole Humphrey | Photography
As I’ve mentioned I love love love sun rays and movement in photos and this photo has both!  The way the little girls hair is blowing back behind her, her arms out and the sun flare!  What’s not to love?!?  I also love that it’s black and white rather than color that you might except to see an image like this be!

Doesn’t this photo make you feel like you’re right in on the action?  Whoooooaaaa!  I’m about to get knocked over by a wave! The colors are vibrant and gorgeous. The suspended water drops are just amazing.  Great, great example of summer {surfing} love!

Some of my favorite photos aren’t of people.  There.  I said it.  I’m a portrait photographer that doesn’t need people in her photos. Sometimes though it’s little details that draw us back in time. I want to know why the dandelion has droplets on it.  How was it discovered? Was it left there or did some little one come by and make a wish?  This photo really engages my imagination and I leaves me wanting to know more about it. Plus the colors are stinking gorgeous.

So I seem to have a color obsession.  I’m sorry. I love the pinky oranges of this image against the nearly silhouetted little girl and her grown up.  It brings back great memories of my eldest who refused to wear anything but tutus and always clutched tightly onto her daddy’s hand.  Don’t you want to know what she’s looking at?  What she’s talking about?  Their body positioning in the image really draws me further into the photo. Makes me wish I was there.

The second I saw this image I loved it! From the vibrant green against the brownish-gray of the wet pavement.  The frozen in time water droplets and the adorable little shoes.  To me it embodies what kids do (and adults want to do) after a summer rain: GO SPLASH IN THE PUDDLES!
Last but not least:
Erin’s share for SUMMER LOVE
“I just snapped this picture of my eldest daughter, Mimi who will be 6 in July! I love it from her crinkly nose and wild hair to her crooked baby teeth. Love this summer baby.”

Thank you to everyone who posted to our timeline!
We hope you will continue to do so!
The new theme for June 15-30 is NIGHT TIME
Looking forward to what you all post!!

Picks for FREE (freedom) Theme | The Thrifty Tog Blog

First, we want to thank everyone so far for posting their FREE (freedom) images to our timeline – we loved seeing them all! You are all so very talented, and we hope that you continue to submit your images on our timeline for our future themes!!

I had chosen the theme FREE (freedom) because I had known the theme was falling on Memorial Day and I wanted to tie that into the theme.


Karen Hunt Photography – I am undoubtedly the biggest sucker for silhouettes. Just love this.

11147840_985133288186428_1759620515983241787_n

My Three Sons Images – I love the light, composition and conversion of this image!

11270574_1608714006073555_2997031602070564657_o

KMills Photography – I love the composition, the hands, flag and hat being the main focus point.

11262404_10205667335017634_2456106546402681028_o

Karen Osdieck Photography – Is there anything more freeing than swinging so high in the sky?!

11018344_10153394199643489_2656573039213569298_n

Holly Nicole Photography – Love the colors, the subject jumping with the umbrella.. so beautiful.

1272338_10205711695524922_3665967359571832213_o

Thank you everyone for posting!


The next bi-weekly theme is going to be awesome! Our guest judge and Official Thrifty Tog Contributor – Erin, Erin Barkel Photography has chosen the theme:

SUMMER LOVE

We can’t wait to see what you share over on our timeline!

Picks for ETHEREAL | The Thrifty Tog Blog

First, we want to thank everyone so far for posting their #ttapr2015ETHEREAL images to our timeline – we loved seeing them all! You are all so very talented, and we hope that you continue to submit your images on our timeline for our future themes!!

I had chosen the theme ETHEREAL and I just love images that look almost heavenly with the light and subject. This was a really fun theme for me.


Mountain Pearl Photography – I am immediately drawn to the seemingly magical light in her hands!

11136279_10153295450838410_4421775008791826719_o

Wild Prairie Photography – I love how her hands are placed on the water to make it look as if it is solid..

11149715_10206682764574010_1903630084532681718_o

Kelsey Smith Photography – love the out of focus look and all of the light!

11154667_10103113984227474_2062795582530307019_o

Rose Amelia Photos – I am in awe of the way the light looks as if it is surrounding her!

11113942_447487095414433_2648430899144803945_n

Melina Nastazia Photography – Absolutely adore this image, the wind in the girls hair, the light.. so beautiful.

11082479_10152714649512443_7197623683008737206_n

My own take on ETHEREAL – Forever Whimsy Photography

I chose this image of Adri & her daughter, Zoe that I took earlier this week. This was my first ever backlit session, and I am slightly obsessed with the way the light highlights and outlines the subjects. I preferred the b&w vs. the color for this one.

9


The new theme chosen by Adri is: THROUGH

Please post your THROUGH images to our timeline from now until 5/16!

Our BIWeekly Self LOVE Theme for April

Moments captured by Cyndi Greenwalt

Such a lovely capture of motherhood in the making.

sl4

Momma got Soul Photography 

So much expressed vulnerability

SL3

MV Clark Photography 

Adore the composition

SL2

Sarah M Photography

Motion goodness captured brilliantly

SL1

Sharon Covert Photography 

the message and emotion blew me away.

SL

Whimsy Heart Photography 

So i choose this theme because my mind was filled with so many ideas to try for my own self love photograph. Unfortunately they all did not pan out, just being real. I sit here typing one handed because I have a tiny babe attached to me. Which is why I choose this image for our bi weekly theme.

SLL

Tissue Paper Flower Tutorial | Snaps + Sprouts Photography

One of our OTTC, Jen, from Snaps + Sprouts Photography is sharing her tutorial for these amazing tissue paper flowers today!


IMG_0229bmgc

Materials Needed:

Plaster of Paris
Chicken wire
Tissue Paper
Floral Wire
Scotch Tape
Wire Cutters
Plastic Cups
Duct Tape
Work Gloves
Zip Ties

Step 1 – Fill plastic cups (I used 12oz plastic drink cups, feel free to break out your red solo cups or whatever fits your fancy) about 3/4 full with Plaster of Paris mixture. You could totally use whatever you have handy, cement etc… just make sure that it is going to give weight to the cup.  This is your flower base and you will cry later if it tips over easily.

Step 2 – Let the mixture set.  Have a glass of wine, and catch up on the Thrifty Tog Blog while you wait.

BeFunky Collage1

Step 3 – Once the mixture has hardened, you are going to take your chicken wire and cut it to your desired length and width.  I did varying sizes but you could also do all one size, or go even taller than I did.  I just went with the flow. Once I had the wire where I wanted it I used a zip tie to hold it together.
*This is where if you have the work gloves, I would put them on.  Chicken wire is pokey!

Step 4 – After you have the wire attached. Bring out the almighty duct tape.  Wrap that stem up! Use as much duct tape as you think you need. I went through 2 rolls.  (I covered all the ends that poked through.  If you can snip off at the edge and avoid the pokies.) 🙂

BeFunky Collage2

Step 5 – Tissue wrap the stem.  I used 2 different colors of green tissue paper (I purchased a large package of rainbow tissue at Wal-Mart, and then also found additional softer colors at our local Hobby Lobby.  The Hallmark Stores would be a good place to check out as well, they always have super fun tissue.  For 1 flower, I made a leaf by using some floral wire and adhering it to the tissue using green washi tape.  It looked pretty cool!  I also made additional leaves on the other stems by just bending and taping tissue paper.  You will be surprised at how well they actually stand up.  I was a bit wary that they were going to droop or appear funny, but in the month(ish) since I have made these they are still looking gorgeous in my studio window for a spring display.

BeFunky Collage3

Step 6 – After you have the stems wrapped this is when the flower part begins.  At first I started by using my precision skills to try and make each petal identical. This lasted for about 10 minutes.  My 5 year old daughter and I found it to be much easier, and much more fun to cut a general petal shape in different sizes and just build the flower all willy nilly wild and free rather than trying to make each one just so. End result, I love them more because of it.
Step 7 –  Once you have your flower all put together (Start largest petals on the bottom and layer multiple smaller layers until you are satisfied with the size and shape of your bloom.  You will then (this is the most complicated part in my opinion because a 2nd set of hands, larger than 5yo hands, would definitely come in handy) twist the back of the bloom into a stem of its own.  Zip tie this TIGHT.  You will then use another zip tie to attach the flower to the stem.

BeFunky Collage4

Step 8 – Finishing touches:  I added a small bit of orange or yellow to the center of the flower and then glued that along with some dried peat moss.  I also bent the stems around and twisted them a bit to get another fun unique look for each flower.

420

Step 9 – Enjoy your beautiful Tissue Paper Flowers!!

BeFunky Collage5

Total cost – Approximately $30.00
(Plaster of Paris, and chicken wire were the bulk of this cost. I also have quite a bit of each left over for future TTB projects.  I also will not be purchasing tissue paper anytime in the near future.)

Window display at the Snaps + Sprouts Studio

11025819_1585342848377188_3342798953054530613_n


Thanks Jen for another awesome tutorial! We’d love to see your flowers.. comment with a link and we will check them out!

New (To You!) Gear on a Budget | The Thrifty Tog Blog

It’s probably not news that I (Jesica) love a good deal! For the most part, I try to buy used items and save money. This is no different when it comes to my photography gear. In fact, I highly recommend buying used gear. I wanted to write this post to help other photographers who are thinking about adding gear; a camera, lens or both – and would like to save some money in the process.

My first camera, Nikon D5100 with kit lens, as well as the 35mm 1.8 (that I eventually sold to my mentee!) were all bought brand new, on Amazon. When I purchased my Nikon, it was $999, the 35mm lens, $196. I spent a total of $1,295.. which doesn’t seem that bad, but at that time I was not even in a business so I couldn’t write them off at tax time, either.

I decided that I wanted the 50mm 1.4 in 2014, and that I did not want to pay the $500 price tag that came with it. So, I began researching buying used. I ended up actually purchasing on a Buy, Sell, Trade group on Facebook. I paid a total of $350, and it arrived in near perfect condition. That lens is my favorite!

I had been toying with the idea of purchasing a new full frame camera, specifically, Nikon D750. Then, I had read something in a photography group that stated, “If you don’t have the cash in hand, don’t buy it,” which really opened my eyes. I was going to put my camera on credit to pay for it. I scratched the idea, and instead, started researching used Canon DSLRs and the 28mm 2.8 lens (thanks to Jessica Byrum’s post on appreciating the equipment you do have) Adri has the Canon 20D which, at the time of my research could be bought for under $100 (!!), I was thinking about the Canon 40D (under $200). At that point, had I purchased the Canon 40D and the 28mm 2.8 lens, it was going to cost around $350 for a completely new (to me!) camera with lens! Adri said to me, “why don’t you look into the Canon 5D classic? That way you can get full frame.” Aha! She’s so smart! So, I decided to research the Canon 5D classic, but the 28mm 2.8 only works for crop frames. I still wanted a wide angle lens, so the 40mm 2.8 was the next best thing.

I purchased my Canon 5D classic for $399 and the 40.mm 2.8 for $126 from Keh.com – a whopping $536 with shipping for a full frame camera and wide angle lens. I have had it for a few weeks now and I absolutely love it 🙂

I have been so happy with my used gear; I don’t particularly think you are taking a chance if you make sure to check out the listing and the seller; ask appropriate questions related to the item prior to purchasing. With cameras, you want to find out how many actuations it has (shutter count) – most cameras, average shutter life is 200,000. I personally wouldn’t purchase a camera with over 100,000. You will want to make sure both cameras and lenses are in working order, have never been dropped, no scratches that impair its ability to perform, etc.

I have compiled a list of places online where you can find used photography gear:

  • Amazon.com – search for items, and then click on the used listings
  • ebay.com – I always click “used” under condition to bypass the new items
  • Facebook Buy, Sell, Trade groups – you can post what you are looking for or browse what people have posted
  • craigslist.org
    • with the above websites – always ALWAYS double check that the seller has good reviews – always purchase with Paypal so that you are protected if the item is not as described in the listing
  • Keh.com, bhphotovideo.com, adorama.com
    • they sell used items; there is a grading scale for the items and priced appropriately

If you know of any other tips or places to find used photography gear, please comment and I will update the list!

Picks for #ttmar2015LUCKY Theme | The Thrifty Tog Blog

First, we want to thank everyone so far for posting their #ttmar2015LUCKY images to our timeline – we loved seeing them all! You are all so very talented, and we hope that you continue to submit your images on our timeline for our future themes!!

buttontthememar2

Feel free to add this button to your blog with a link back!


Adri & I are going to try something new. We are going to switch off picking themes and blog our own picks each theme.

So, I had picked LUCKY as a theme. St. Patrick’s Day fell in this theme’s time frame. I wanted to pick something that had to do with that. I chose lucky – which can be interpreted so many ways. I hope that it was a fun theme for you all!

My #ttmar2015LUCKY image:

Forever Whimsy Photography

ava2 copy

These images are in no particular order 🙂

Holly Nicole Photography – I really loved this. What a precious moment between two generations.

10380833_10205281756976727_2644626533543472796_o

Bubble Gum and Glitter – Children’s Lifestyle Photography – The green here and the four leaf clovers remind me of luck and St. Patrick’s Day 🙂

11037663_1605534482998078_7255736011870913463_o

Brooke Ashley Photography – The connection in this photo really draws me in.

1898750_485388074943102_2861278509759557149_o

JayCee Photography – I love the emotion in this image.. lucky in love!

11080852_1566871853588565_2394603906965571333_o

Karen Osdieck Photography – this is such a great moment for these two to remember!!

11080967_10153261839938489_5418837822981646876_n

So – up next, Adri picked the theme..

SELF LOVE!

Post your DSLR self portraits to our timeline #ttapr2015selflove from April 1 to April 15!